Quick Start Guide
This guide is a hands-on tutorial to get you started using the ThingsBoard REST API.
0. Prerequisites
Before you start, you need:
A valid user account:
Username (email)
Password
Postman installed (for the login demo) Link to download
curl available in your terminal (Git Bash / macOS / Linux)
1. Step 1 – Log In and Get a Token (Postman)
1.1 Create a New Request
Open Postman.
Click New → HTTP Request (or use an existing collection and add a request).
Set:
Method:
POSTURL:
https://iotpro.iotsolutions.com.mt/api/auth/login

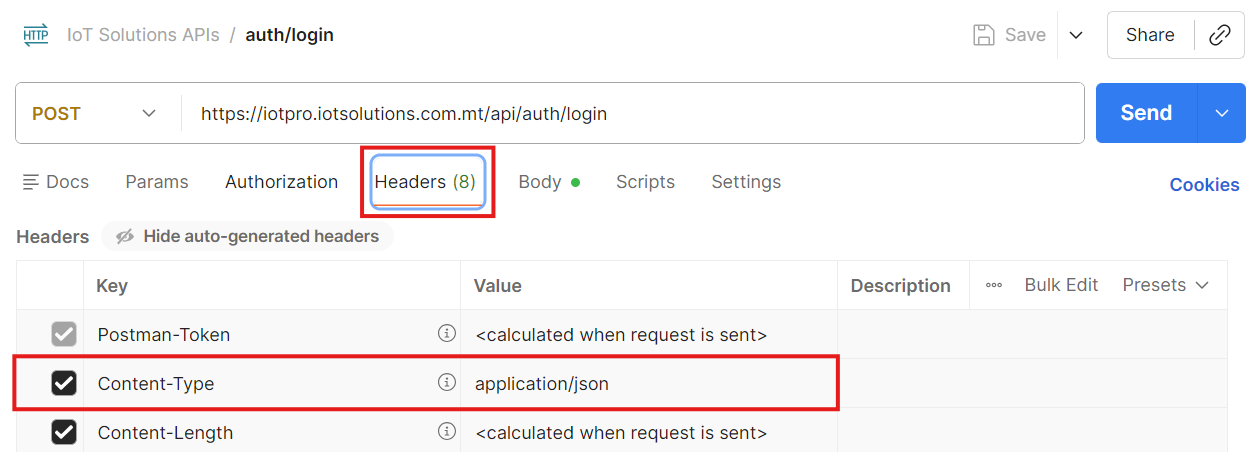
1.2 Set Headers
Go to the Headers tab and make sure you have:
Key | Value |
|---|---|
Content-Type |
|
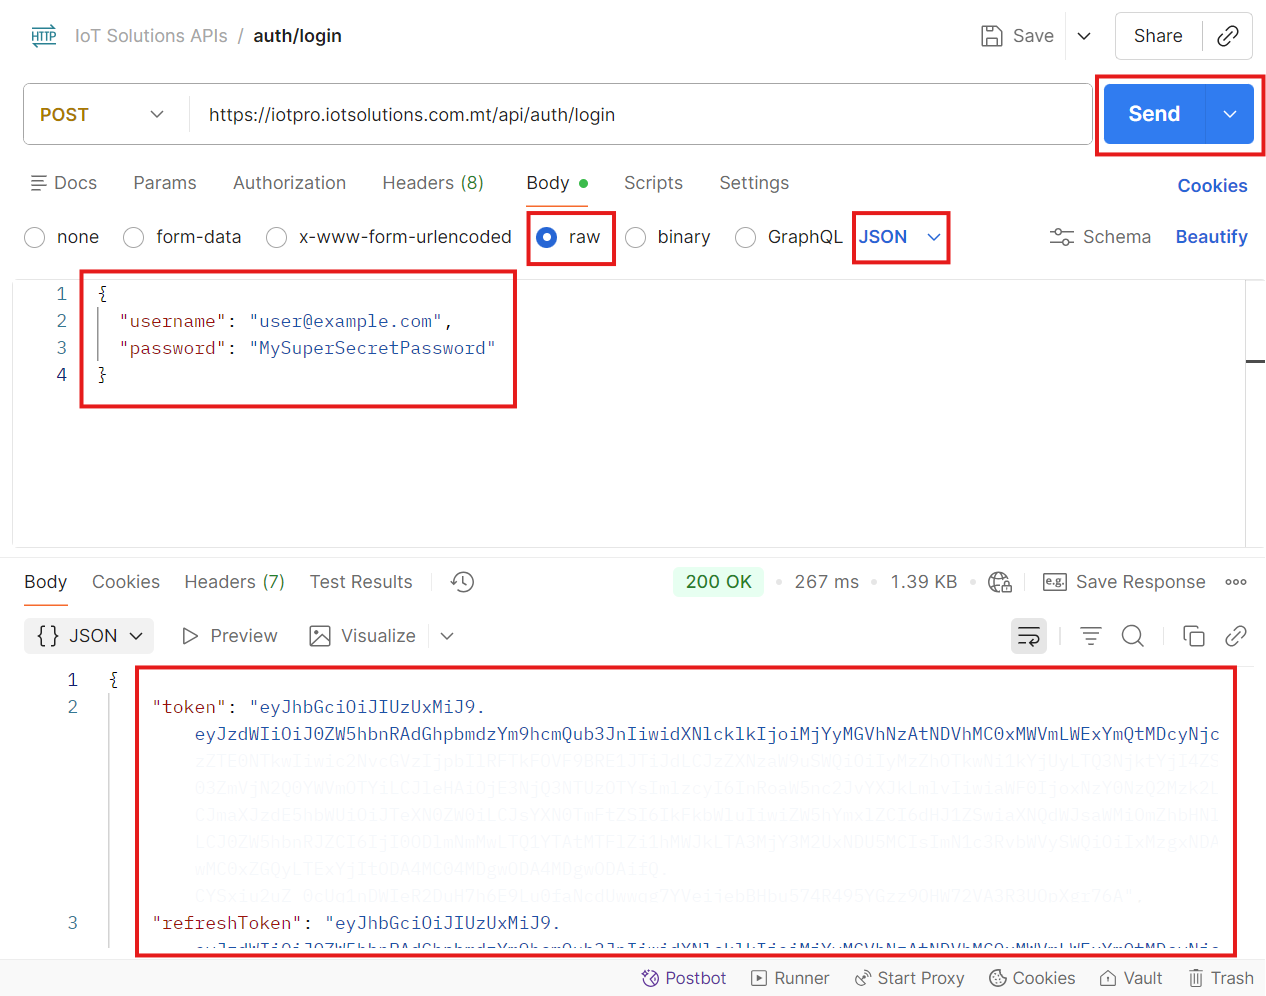
1.3 Set Body
Go to the Body tab.
Select raw and choose JSON.
Enter:
{
  "username": "<USERNAME>",
  "password": "<PASSWORD>"
}Note: replace <USERNAME> & <PASSWORD> with actual email and password
1.4 Send and Inspect Response
Click Send.
In the Response body, you should see JSON similar to:
{ "token": "eyJhbGciOiJIUzI1NiIsInR5cCI6IkpXVCJ9...", "refreshToken": "eyJhbGciOiJIUzI1NiIsInR5cCI6IkpXVCJ9..."}
1.5 Save Token
To make future calls you will need to use the JWT token you received.
This token has an expiration time, so for long-running tools you’ll need to log in again in future.
For this tutorial, we’ll switch to curl for the remaining steps.
2. Step 1b – Log In and Get a Token (curl)
You can get the same token via curl.
curl -X POST "https://iotpro.iotsolutions.com.mt/api/auth/login" \ -H "Content-Type: application/json" \ -d '{ "username": "<USERNAME>", "password": "<PASSWORD>" }'
You’ll get back JSON like:
{ "token": "eyJhbGciOiJIUzI1NiIsInR5cCI6IkpXVCJ9...", "refreshToken": "eyJhbGciOiJIUzI1NiIsInR5cCI6IkpXVCJ9..."}
Copy the token value and keep it somewhere (we’ll call it <JWT_TOKEN>).
3. Step 2 – Use the Token to Get Your Devices (curl)
As a Customer User, you can only see devices that belong to your customer.
To list them, we’ll first get your customerId, then list devices for that customer.
3.1 Get Your Customer ID
Use your <JWT_TOKEN> to call /api/auth/user:
curl -X GET "https://iotpro.iotsolutions.com.mt/api/auth/user" \ -H "X-Authorization: Bearer <JWT_TOKEN>"
Example:
curl -X GET "https://iotpro.iotsolutions.com.mt/api/auth/user" \ -H "X-Authorization: Bearer eyJhbGciOiJIUzI1NiIsInR5cCI6IkpXVCJ9..."
You should see something like:
{ "id": { "id": "f1234560-aaaa-bbbb-cccc-0123456789ab" }, "name": "John Doe", "email": "user@example.com", "authority": "CUSTOMER_USER", "tenantId": { "id": "..." }, "customerId": { "id": "abcd1234-eeee-ffff-9999-0123456789ab", "entityType": "CUSTOMER" } }
Take note of:
customerId.id→ this is your Customer ID
Let’s call it<CUSTOMER_ID>.
3.2 List Devices for Your Customer
Now list devices that belong to your customer:
curl -X GET "https://iotpro.iotsolutions.com.mt/api/customer/<CUSTOMER_ID>/devices?pageSize=10&page=0&sortProperty=createdTime&sortOrder=DESC" \ -H "X-Authorization: Bearer <JWT_TOKEN>"
Replace <CUSTOMER_ID> and <JWT_TOKEN> with your values.
Example:
curl -X GET "https://iotpro.iotsolutions.com.mt/api/customer/abcd1234-eeee-ffff-9999-0123456789ab/devices?pageSize=10&page=0&sortProperty=createdTime&sortOrder=DESC" \ -H "X-Authorization: Bearer eyJhbGciOiJIUzI1NiIsInR5cCI6IkpXVCJ9..."
You should get a paged response:
{ "data": [ { "id": { "id": "c8f2fdf0-1234-11ef-9a9d-0123456789ab", "entityType": "DEVICE" }, "name": "GEN-01 Energy Meter", "type": "ENERGY_METER", "label": "EM-GEN-01" }, { "id": { "id": "d9a0a720-5678-11ef-9a9d-0123456789ab", "entityType": "DEVICE" }, "name": "GEN-02 Energy Meter", "type": "ENERGY_METER", "label": "EM-GEN-02"
} ], "totalPages": 1, "totalElements": 2, "hasNext": false}
From here, choose one device to continue with.
Pick any entry from
data.Note its ID:
data[i].id.id→ this will be your<DEVICE_ID>.
Example:
<DEVICE_ID> = c8f2fdf0-1234-11ef-9a9d-0123456789ab
4. Step 3 – Get Information for a Specific Device (curl)
Now we’ll fetch full details for your selected device.
curl -X GET "https://iotpro.iotsolutions.com.mt/api/device/<DEVICE_ID>" \ -H "X-Authorization: Bearer <JWT_TOKEN>"
Example:
curl -X GET "https://iotpro.iotsolutions.com.mt/api/device/c8f2fdf0-1234-11ef-9a9d-0123456789ab" \ -H "X-Authorization: Bearer eyJhbGciOiJIUzI1NiIsInR5cCI6IkpXVCJ9..."
Typical response:
{ "id": { "id": "c8f2fdf0-1234-11ef-9a9d-0123456789ab", "entityType": "DEVICE" }, "tenantId": { "id": "..." }, "customerId": { "id": "abcd1234-eeee-ffff-9999-0123456789ab" }, "name": "GEN-01 Energy Meter", "type": "ENERGY_METER", "label": "EM-GEN-01", "additionalInfo": { "description": "Main generator energy meter" }}
Now you know:
The device is visible to your customer.
Its ID and type are correct.
You can confidently query telemetry and alarms for this
<DEVICE_ID>.
5. Step 4 – Get Telemetry for the Device (curl)
We’ll now fetch latest telemetry values for this device using the Timeseries API.
5.1 Choose Telemetry Keys
You need to know which telemetry keys your device sends. Common examples:
time_param_unix_absolutedevice_id
If you’re not sure, you can:
Call the keys endpoint:
curl -X GET "https://iotpro.iotsolutions.com.mt/api/plugins/telemetry/DEVICE/<DEVICE_ID>/keys/timeseries" \ -H "X-Authorization: Bearer <JWT_TOKEN>"
Example output:
["power","voltage","current"]
For this tutorial, we’ll assume the device has a key called power.
5.2 Get Latest Telemetry Values
Endpoint (latest values):
GET /api/plugins/telemetry/DEVICE/{deviceId}/values/timeseries?keys=key1,key2
Example (for a single key power):
curl -X GET "https://iotpro.iotsolutions.com.mt/api/plugins/telemetry/DEVICE/<DEVICE_ID>/values/timeseries?keys=power" \
-H "X-Authorization: Bearer <JWT_TOKEN>"
Concrete example:
curl -X GET "https://iotpro.iotsolutions.com.mt/api/plugins/telemetry/DEVICE/c8f2fdf0-1234-11ef-9a9d-0123456789ab/values/timeseries?keys=power" \
-H "X-Authorization: Bearer eyJhbGciOiJIUzI1NiIsInR5cCI6IkpXVCJ9..."
Example response:
{ "power": [ { "ts": 1712048400000, "value": "123.4" } ]}
What this means:
power– the telemetry key.ts– timestamp in milliseconds since Unix epoch.value– last recorded value (string; can be parsed to a number).
If you want multiple keys at once:
curl -X GET "https://iotpro.iotsolutions.com.mt/api/plugins/telemetry/DEVICE/<DEVICE_ID>/values/timeseries?keys=power,voltage,current" \
-H "X-Authorization: Bearer <JWT_TOKEN>"
If you get {} (empty JSON):
The device may not have telemetry for those keys yet.
You may be using a wrong key name (typo / case sensitive).
6. Step 5 – Get Alarms for the Device (curl)
Finally, let’s list alarms attached to your device (e.g. generator fault, temperature high, etc.).
6.1 Alarm Search Endpoint
We’ll use the device-specific alarm endpoint:
GET /api/alarm/DEVICE/{deviceId}
With query parameters to control status and paging:
searchStatus– e.g.ANY,ACTIVE,CLEAREDstatus– typicallyANYpageSize– how many per pagepage– page index (0-based)sortProperty– usuallycreatedTimesortOrder–ASCorDESC
6.2 Example Request
curl -X GET "https://iotpro.iotsolutions.com.mt/api/alarm/DEVICE/<DEVICE_ID>?searchStatus=ANY&status=ANY&pageSize=10&page=0&sortProperty=createdTime&sortOrder=DESC" \ -H "X-Authorization: Bearer <JWT_TOKEN>"
Concrete example:
curl -X GET "https://iotpro.iotsolutions.com.mt/api/alarm/DEVICE/c8f2fdf0-1234-11ef-9a9d-0123456789ab?searchStatus=ANY&status=ANY&pageSize=10&page=0&sortProperty=createdTime&sortOrder=DESC" \ -H "X-Authorization: Bearer eyJhbGciOiJIUzI1NiIsInR5cCI6IkpXVCJ9..."
Example response:
{ "data": [ { "id": { "id": "e7cd3a40-2345-11ef-9a9d-0123456789ab", "entityType": "ALARM" }, "type": "GENERATOR_FAULT", "originator": { "id": "c8f2fdf0-1234-11ef-9a9d-0123456789ab", "entityType": "DEVICE" }, "severity": "MAJOR", "status": "ACTIVE_UNACK", "startTs": 1712050000000, "endTs": 0, "ackTs": 0, "clearTs": 0, "details": { "code": "E-123", "description": "Generator stopped unexpectedly" } } ], "totalPages": 1, "totalElements": 1, "hasNext": false}
If "data": []:
No alarms match your filters (
searchStatus/status).Try
searchStatus=ACTIVEorsearchStatus=ANY
If you get 403 or 404:
Your Customer User may not have access to that device or alarms.
Double-check that
<DEVICE_ID>came from your own/api/customer/<CUSTOMER_ID>/deviceslist.